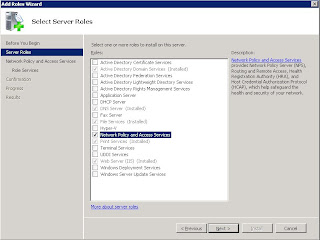
As a first step we will add the network policy and access services role to our windows server. The following selections will be enough for our purpose:
Now, we are good to create our new network policy. Inside administrative tools we will find a new console called Network Policy Server. We open it and on the policies, we right click and select New:
As next step, we will specify the security group My VPN Group as condition:
We select Access granted on the next window. Next step will be configure the Authentification method:
We modify the selections as per the above screen shot, and we proceed to add a Eap type. As per Constrains we can set the timeout in 30 minutes, and on the settings tab we set the Service-Type to Login and remove the default Framed-Protocol attribute:
On the Vendor Specific section we will ad a vendor with the value All and *in case that we want our users to have level 15 (admin) on the router* then we would need to add an attribute from Cisco and set the string value Shell:priv-lvl=15:
We are done with the policy. Now we need to create a radius client. In the main Network Policy Server console right click on Radius Clients and click on New Radius Client. We enter the client name (router name), it's IP and the authentication password :
We have finished the windows part, now we'll need to enter some commands in the router. SSH it and enter in config terminal mode:
- aaa new-model
- radius-server host radius.company.local timeout 3 retransmit 2 key <pre entered shared-secret>
- default timeout = 5
- default retransmit = 3
As best practice, in case we have management / dedicated IT infrastructure VLAN we will make the radious auth go trough that one (Vlan1 in the example):
- ip radius source-interface Vlan1
- aaa authentication login default group radius local
- aaa authorization exec default group radius local
- end
- line vty 0 15
- login authentication default
- end


No comments:
Post a Comment