Saturday, October 22, 2011

Lazy access Microsoft SQL Server from our linux box

In order to connect to our SQL Server we will need to install the following packages:

Once we have them installed we will proceed to modify the /etc/freetds.conf file:
[root@web-devel-01 ~]# cat /etc/freetds.conf
[mydatabase]
Description     = SQL_Instance
Driver          = FreeTDS
Server          = 10.10.10.1
Port            = 1433
tds version     = 8.0
Database        = mydatabase
Trace           = no
Now we create the temporary file tds.driver with the following content:

[root@web-devel-01 ~]# cat tds.driver
[FreeTDS]
Description     = v0.63 with protocol v8.0
Driver          = /usr/lib64/libtdsodbc.so.0.0.0 # this location might change depending your linux distribution, installation path, etc
This file contains the data needed to register the FreeTDS driver. Let's install it trough this command:
[root@web-devel-01 ~]#odbcinst -i -d -f tds.driver
Also, we will install the data source:
[root@web-devel-01 ~]#odbcinst -i -s -f /etc/freetds.conf
If everything went ok, the odbcinst should have returned 0 value after execution and the driver will be contemplated in the file /etc/odbcinst.ini and the data source in the /etc/odbc.ini file.

Now let's try our connection:
[root@web-devel-01 ~]# isql mydatabase sa pepito
+---------------------------------------+
| Connected!                            |
|                                       |
| sql-statement                         |
| help [tablename]                      |
| quit                                  |
|                                       |
+---------------------------------------+
SQL>
It's working!

If we would like to add support to our apache + php server, we need to install the package php-odbc. We can use the Data Source Name from the ODBC, or we can use only the driver and do a DSN less connection. This is an example code of it:

<? putenv("ODBCINI=/etc/odbc.ini");
putenv("ODBCINSTINI=/etc/odbcinst.ini");
$data_source='mydatabase';
$user='sa';
$password='pepito';
$database = 'mydatabase';

#$cn = odbc_connect("$data_source","$user","$password");  #DSN connection
$cn = odbc_connect("Driver=FreeTDS;Server=10.10.10.1;Database=mydatabase;UID=$user;PWD=$password;","$user","$password"); # DSN-less

print_r($cn);
die;
if (!$conn){
    if (phpversion() < '4.0'){
        exit("Connection Failed: . $php_errormsg" );
    }
    else{
        exit("Connection Failed:" . odbc_errormsg() );
    }
} ?>

Wednesday, October 19, 2011

Lazy postfix address masquerade with external ssl smtp

To provide our postfix with  a "smart host" using an external SSL smtp account we need to:
  • Create the file  /etc/postfix/sasl-password  with the respective relay host credentials. Use this syntax:
 our-external-smtp.server.com:smtp-port myusername:mypassword
  •  Create the file /etc/postfix/generic containing the email address to masquerade from our local domain:
 @localhost.localdomain myemailaddress@our-external-smtp.server.com
  • Now we postmap both files:
[root@localhost postfix]# postmap /etc/postfix/sasl-passwd
[root@localhost postfix]# postmap /etc/postfix/generic
  • Add the following lines to the file main.cf:
    smtp_sasl_auth_enable = yes
    smtp_sasl_password_maps = hash:/etc/postfix/sasl-passwd
    smtp_sasl_security_options = [noanonymous]
    relayhost = our-smtp.server.com:smtp-port
    smtp_sasl_mechanism_filter = plain,login
    smtp_tls_security_level = may
    smtp_generic_maps = hash:/etc/postfix/generic
  •  Reload postfix with postfix reload. It should be working by now.

Monday, September 19, 2011

Lazy Web Proxy Auto-Discovrey protocol configuration

To setup the WPAD in our network we can choose between these options:

  1. DHCP
  2. DNS
  3. AD group policy enforcing PAC (Proxy Auto Configuration) file
The .PAC file contains the configuration for the proxy. We will need to prepare a http server to serve this file.

  • DHCP under using linux's isc dhcpd

This configuration is set trough the option wpad-url. Since version 3 we need to specify what code and content it has:

option wpad-url    code 252 = text;
option wpad-url    "http://sin-proxy-001.local.domain/proxy.pac ";


We add these lines to the dhcpd.conf and reload the service.

  • DNS serving wpad
We need to create two records, one type A named wpad pointing to the IP address  of the server with the .PAC file and another one with TXT content specifying the URL to locate the .PAC file. On windows would look something like this:


 On linux, we need to add some lines in our zone with this content:
$ORIGIN local.domain.
wpad            IN      A       10.9.98.2
                IN      TXT     "service: wpad:!http://sin-proxy-001.local.domain:80/proxy.pac"
wpad.tcp        IN      SRV     0 0 80 sin-proxy-001.local.domain.
After that, reload DNS service.

  • AD Group Policy wpad enforcing
We open the Group Policy Management Console and create a new policy. Then we proceed to edit and we go to Computer Configuration - > user configuration - > windows settings -> Internet Explorer Maintenance -> connection and we set our preferences:


To avoid caching problems, is better to disable that feature for the .pac file:


If our users are too naughty and they disable the proxy, we can always remove this privilege from them activating the option Make proxy settings per-machine:


We have finished the WPAD policy.

  • The .PAC file
As a basic example, this will provide proxy for everything and if it fails we will provide direct access. If the host try to access our intranet connection will be direct, and if is on our local office network proxy will be enforced:


function FindProxyForURL(url, host) {
      else if (shExpMatch(host, "*.myintranet.com"))
      {
         return "DIRECT";
      }
      else if (isInNet(host, "10.9.98.0",  "255.255.255.0"))
      {
         return "PROXY sin-proxy-001.local.domain:3128";
      }
      else
      return "PROXY sin-proxy-001.local.domain:3128; DIRECT";
}
  •  Web server configuration on Apache & Linux
This would be the configuration file on the sites-available folder (you'd need to enable it later). Is important to specify the .pac extension type:


MyServer:/etc/apache2/sites-available# cat sin-proxy-001
<VirtualHost *:80>
        ServerAdmin admin@local.domain.com
        ServerName sin-proxy-001.local.domain
        DocumentRoot /var/www/proxy/
        AddType application/x-ns-proxy-autoconfig .pac
        <Directory />
                Options FollowSymLinks
                AllowOverride None
        </Directory>
        ErrorLog ${APACHE_LOG_DIR}/wpad-error.log
        LogLevel warn
        CustomLog ${APACHE_LOG_DIR}/wpad-access.log combined

</VirtualHost>

Thursday, September 15, 2011

Lazy deployment of Active Directory group policies over firefox

This scenario has been tested using frontmotion firefox msi installer available at http://www.frontmotion.com/
 
First of all we will download and install the add-on this link. We can see that in our firefox profile's extensions folder (%APPDATA%/Mozilla/Firefox/Profiles/<profile>/Extensions) there's a new one called gpofirefox@extensions.org, if we copy that folder into other Firefox profile's extension folder it will apply without any other touching.

Now we will:

  • Put the add-on in a shared folder available for all the clients (\\ARSGPDC\software)
  • Add the Firefox policy template to our server
  • Add visual script on login time to copy this add-on to all the available firefox profiles
First step, download the .adm file in our computer. Then, we will need to open the group policy management console available in the administrative tools and create a new policy, for example called Set.Firefox.GlobalPreferences. We go to Administrative Templates under Computer Configuration, and select Add Template from the All Tasks menu using the right click:


And now we can start to edit our group policies with the new available menu:


Now, we can add this example vbs script in the logon scripts under the User Configuration. As I'm not much of a developer, this script is quiet dirty and have defined variables that are not used. However, it does work :)


The VB script basically will:

  1. Create the local folder c:\software
  2. Copy the add-on from the shared folder \\ARSGPDC\Software\FrontMotion\gpofirefox@extensions.org
  3. Copy the extension to each available profile in the user's firefox folder
  4. Create a control point on c:\software\gpofirefox.txt to avoid copying over and over again.

Here's the shit:

Option Explicit

'Set variables
Dim filesys
DIM fso
Dim WshShell
Dim return
Dim oFSO
Dim WshSysEnv
Dim AppdataPath
Dim FoxProfilePath
Dim GPOPath
Dim ProfileFolder
Dim ExtensionsPath

Set oFSO = CreateObject("Scripting.FileSystemObject")
Set WshShell = CreateObject("WScript.Shell")
Set WshSysEnv = WshShell.Environment("PROCESS")
AppdataPath = WshSysEnv("APPDATA")
FoxProfilePath = AppdataPath & "\Mozilla\Firefox\Profiles\"
GPOPath = "C:\software\gpofirefox@extensions.org"

'Set Object
Set fso = CreateObject("Scripting.FileSystemObject")
Set filesys = CreateObject("Scripting.FileSystemObject")
If (fso.FileExists("C:\software\gpofirefox.txt")) Then
        if oFSO.FolderExists(FoxProfilePath) Then
                        For Each ProfileFolder In oFSO.GetFolder(FoxProfilePath).Subfolders
                                        ExtensionsPath =ProfileFolder & "\extensions\"
                                        'MsgBox(ExtensionsPath)
                                        oFSO.Copyfolder "C:\software\gpofirefox*",ExtensionsPath,True
                        Next
        End If
        Else

        'first check for folder
        Dim objFSO
        Set objFSO= CreateObject("Scripting.FileSystemObject")                                                                                                                
        'Create the folder software                                                                                                                                           
        If Not objFSO.FolderExists("C:\software") then                                                                                                                        
        objFSO.CreateFolder("C:\software")
        End If
        'copy folder
        Set WshShell = CreateObject("WScript.Shell")
        WshShell.Run "c:\windows\system32\xcopy.exe /E /I /Y /H \\ARSGPDC\software\FrontMotion\gpofirefox@extensions.org c:\software\gpofirefox@extensions.org",0,true
        'Create control file
        Dim objFile
        Set objFSO = CreateObject("Scripting.FileSystemObject")
        Set objFile = objFSO.CreateTextFile("C:\software\gpofirefox.txt")
        if oFSO.FolderExists(FoxProfilePath) Then
                        For Each ProfileFolder In oFSO.GetFolder(FoxProfilePath).Subfolders
                                        ExtensionsPath =ProfileFolder & "\extensions\"
                                        'MsgBox(ExtensionsPath)
                                        oFSO.Copyfolder "C:\software\gpofirefox*",ExtensionsPath,True
                        Next
        End If
End If
'Exit Script


WScript.Quit()


Sunday, September 11, 2011

Lazy radius authentification with Cisco and Windows 2008

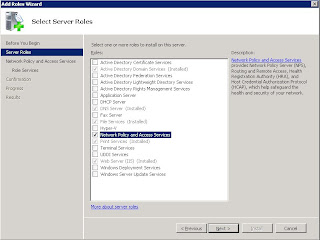
As a first step we will add the network policy and access services role to our windows server. The following selections will be enough for our purpose:


Now, we are good to create our new network policy. Inside administrative tools we will find a new console called Network Policy Server. We open it and on the policies, we right click and select New:


 We set the new policy name and as per type of network access server we select Unspecified:

 
As next step, we will specify the security group My VPN Group as condition:

We select Access granted on the next window. Next step will be configure the Authentification method:

We modify the selections as per the above screen shot, and we proceed to add a Eap type. As per Constrains we can set the timeout in 30 minutes, and on the settings tab we set the Service-Type to Login and remove the default Framed-Protocol attribute:


On the Vendor Specific section we will ad a vendor with the value All and *in case that we want our users to have level 15 (admin) on the router* then we would need to add an attribute from Cisco and set the string value Shell:priv-lvl=15:


We are done with the policy. Now we need to create a radius client. In the main Network Policy Server console right click on Radius Clients and click on New Radius Client. We enter the client name (router name), it's IP and the authentication password :


We have finished the windows part, now we'll need to enter some commands in the router. SSH it and enter in config terminal mode:

  • aaa new-model
  • radius-server host radius.company.local timeout 3 retransmit 2 key <pre entered shared-secret>
  • default timeout = 5
  • default retransmit = 3
 As best practice, in case we have management / dedicated IT infrastructure VLAN we will make the radious auth go trough that one (Vlan1 in the example):

  • ip radius source-interface Vlan1
 Now that we have the radius set up, we will add it to the router's authentification methods:

  • aaa authentication login default group radius local
  • aaa authorization exec default group radius local
  • end
*if you want to allow radius clients to login trough terminal sessions, then we would add:
  • line vty 0 15
  • login authentication default
  • end
Now we can add different groups for our remote admins, VPN users, etc.

Sunday, August 28, 2011

Lazy sip trunk with asterisk

In this scenario we are providing a sip trunk to connect two asterisk in different offices (Bangkok and Singapore), connected trough vpn already set up. Since we already have a secure firewall we won't be adding username authentication (otherwise we really should!). Bangkok have the extensions in the 6XXX range, Singapore in the 5XXX.

In BangkokÅ› side, we edit the file sip.conf and we add the following - changing ip for your host's one, trunk name, favorite codecs and context. That that last one I left it by default, so calling between PABX is enabled by default in both places (lazy way :)


  • In Bangkok's sip.conf:


[Singapore]
host = 10.9.9.1
username =
secret =
trunkname = singapore
group = null
hasexten = no
hasiax = no
hassip = yes
registeriax = no
registersip = yes
trunkstyle = voip
disallow = all
allow = g729,ulaw,gsm
insecure = port,invite
nat = no
qualify = yes
context = defaultDialPlan
careinvite = no
  • In Singapore's sip.conf:


[Bangkok]
host = 10.8.9.1
username =
secret =
trunkname = bangkok
group = null
hasexten = no
hasiax = no
hassip = yes
registeriax = no
registersip = yes
trunkstyle = voip
disallow = all
allow = g729,ulaw,gsm
insecure = port,invite
nat = no
qualify = yes
context = defaultDialPlan
careinvite = no

Now we have the sip trunk configured, we will create a digit map to be able to call.
  • Edit Bangkok's extensions.conf:
[InterPABX]
 exten => _5XXX,1,DIAL(SIP/Singapore/${EXTEN})
  • Edit Singapore's extensions.conf:
[InterPABX]
 exten => _6XXX,1,DIAL(SIP/Singapore/${EXTEN}) 
 After this, we need to add the InterPABX rule to the default dial plan in the extensions.conf in both sides:

[defaultDialPlan]
...
 [InterPABX]

We are done. Now we reload the sip and dialplan:


  • asterisk -rv
  •  BKK-asterisk-001*CLI>sip reload
  •  BKK-asterisk-001*CLI>dialplan reload
  •  BKK-asterisk-001*CLI>exit


Now we can grab a phone and make our first free call between our two places.

Sunday, August 21, 2011

Lazy Postfix queue management

Postfix do come with some nice utilities to manage it's queues. In this case we are using qshape, postqueue and postsuper.

qshape allows us to check the 'shape' of the queues. The available queues are:

  • incoming - messages pending to be processed
  • hold - queue available to deposit messages that will remain on standby
  • active - messages being processed at that moment
  • deferred - messages that can't be delivered at that moment
  • maildrop - messages delivered locally
for checking the incoming, hold and active queues we will execute qshape -s incoming hold active (-s for displaying the sender domain's statistics)


                          T 5 10 20 40 80 160 320 640 1280 1280+
TOTAL             6  2  2    0    0    0     0     0     0      0     2
asiarooms.com  1  1  0    0    0    0     0     0     0      0     0
jahoo.com          3  1  2    0    0    0     0     0     0      0     0
pepeluis.es        2  0  0    0    0    0     0     0     0      0     2

The statistic shows us that we have a total of 6 emails, one email from asiarooms arrived in less than 5 minutes, 3 from jahoo.com that arrived between 1 and 10 minutes, and two from pepeluis.es with an age of more than 1280 minutes. 

A more detailed examination can be performed with the tool postqueue:

#postqueue -p

-Queue ID- --Size-- ----Arrival Time---- -Sender/Recipient-------
2FEE01260AA*   28213 Fri Aug 19 03:00:12  pepe.lopez@asiarooms.com  pepe.lopez@asiarooms.com

D516B1260A4*    5799 Fri Aug 19 03:00:22  faemalia@jahoo.com  info@asiarooms.com

028691260B8*    5803 Fri Aug 19 03:00:23  faemalia@jahoo.com  info@asiarooms.com


-- 19 Kbytes in 3 Requests.

The Queue ID will tell us the ID of each message. If we would like to get rid of any email, we can use the tool postsuper :

#postsuper -d 2FEE01260AA

That command will delete the first email showed from the postqueue. If we would like to delete all the current messages in a particular queue (i.e., deferred queque):

#postsuper -d ALL deferred

Or just all our emails to be delivered:

#postsuper -d ALL

This is a very basic overview of these commands, a lot more functions are shown on each command's man page, or in the official postfix documentation http://www.postfix.org/documentation.html


Tuesday, August 9, 2011

Lazy setup of a Cisco Wireless LAN Controller on a 2951 router

Once the card is installed in the router we can access giving an IP address to the WLC and using the service-module command:

  • Cisco#config t
  • Cisco(config)#interface Integrated-Service-Engine1/0
  • (can be 2/0 depending on what bay you intalled the card)
  • Cisco(config)# ip address 10.9.9.254 255.255.255.0
  • Cisco(config)# ip nat inside
  • Cisco(config)# end
Now we can start a session on the module:
  • Cisco#service-module Integrated-Service-Engine 1/0 session
  • Trying 10.9.9.254, 2131 ... Open


    User Access Verification

    Username:
Default credentials are admin / admin. The first time we will go trough a configuration wizard where we can define the management, ap-manager and virtual router addresses, between other options. When we are done, we can exit from the session using the key combination [ctrl + alt + 6, then x].

Once we have our WLC properly configured, we need to add the magic options to the dhcp in order to associate the AP with the WLC - in my case the AP is a Airo 3500. If you use this model with a WLC running old software you will need to upgrade to the latest 7.0 verion - you can find the firmware on Cisco's download section, the file is named AIR-WLCM-K9-7-0-116-0.aes.

We add the AP to the dhcp as follows:


  • option space Cisco_LWAPP_AP;
    option Cisco_LWAPP_AP.server-address code 241 = array of ip-address;
    option Cisco_LWAPP_AP.controller code 43 = string;
  • host AIRO-3500-Kitchen {
            hardware ethernet e0:5f:b9:10:66:68;
            fixed-address 10.9.9.199;
            option vendor-class-identifier "Cisco AP 3500";
            vendor-option-space Cisco_LWAPP_AP;
            option Cisco_LWAPP_AP.server-address <list of controller IPs>;
            option routers 10.9.99.254;
    }
After the AP gets the config from the DHCP it will appear in the WLC access point list. You can finalize the setup doing a telnet on port 2131 of the management card or just using a web browser on the IP setup during the wizard as management IP.

In case you want to use the same IP as the current router's we can add this config:
  • Cisco#config t
  • Cisco(config)#interface Integrated-Service-Engine1/0
  • Cisco(config)# ip unnumbered <your router's interface name (gigabitethernet0/0?)
  • Cisco(config)# end
And if we want to add add dot1Q (vlan) to your ESSID:

  • (Previously created the first ESSID on the WLC)
  • Cisco#config t
  • Cisco(config)#interface Integrated-Service-Engine1/0.1 <- ESSID identifier
  • Cisco(config)# encapsulation dot1Q 888 <- VLAN ID
  • Cisco(config)# ip address 10.9.8.254 255.255.255.0
  • Cisco(config)# ip nat inside
  • Cisco(config)# end

You might need to modify your routing table depending on your setup, specifying where the WLC interfaces are located:

  • Cisco#config t
  • Cisco(config)#ip route <WLC IP> <netmask> interface Integrated-Service-Engine1/0
  • Cisco(config)#end

For additional information about this card's setup you can check:


Monday, August 8, 2011

Lazy WEP key test with aircrack-ng on Debian

We can test how secure are our old WEP wi-fi keys following these few steps:

1 - Ensure you have a compatible chipset:


2 - Install aircrack-ng:

  • Nova:amartin# sudo apt-get install aircrack-ng

3 - Load the monitor on your wi-fi interface:

  • Nova:amartin# sudo airmon-ng start <wlan interface>

 4 - Start to capture the traffic with the dump utility:

  • Nova:amartin# sudo airodump-ng -w /tmp/mykey -d <your AP BSSID>

5 - After a while, and with enough traffic captured (10K+ packets) let's try to find out the key:

  • Nova:amartin# sudo aircrack-ng /tmp/mykey*cap
  • (* for if we have multiple capture files)

6 - After some processing probably you will find your key in hexadecimal


7 - Change your security to WPA2 at least :)

Sunday, August 7, 2011

Lazy mrtg graphs with Debian + Cisco

1 - SSH / telnet / whatever to your router and enable snmp :

  • Cisco#Config t
  • Cisco(config)#snmp-server community public RO
  • Cisco(config)#end
  • (you may need to modify ACL to allow traffic to the snmp port)

2 - Install snmp, mrtg and your favorite web server packages on your debian - lighthttpd in this case:

  • Nova# sudo apt-get update
  • Nova# sudo apt-get install mrtg lighttpd snmp 
  • (Satisfy all the depencies shown)

3 - Check snmp is working properly:

  • Nova# snmpwalk -v 2c -C public <router IP>
  • (You should be seeing lots of strings, then it works!)

4 - Create the templates for mrtg:

  • Nova# sudo cfgmaker -global WorkDir:/var/www/mrtg --output=/etc/mrtg/myrouter.cfg public@<router IP>
  • (You might want to edit the cfg file to customize the options, interfaces, etc. I always add Options[_]:growright)

5 - Create the file /etc/cron.d/mrtg with this content and make cron check your device:

       */5 * * * * root env LANG=C /usr/bin/mrtg /etc/mrtg/myrouter.cfg 2>&1

6 - Create the index file for viewing the graphs executing this command:

  • Nova# sudo indexmaker --sort=title --output=/var/www/mrtg/index.html /etc/mrtg/myrouter.cfg


8 - Configure your browser to be able to show the index.html created before.

9 - Open the html file with your browser (http://localhost/mrtg ?)

10 - Wait some minutes to check all the graphs are showing properly :)